Description
The default working mode of the module is wideband, the transmit/receive frequency points are 150.050MHz, and the transmit/receive subcarriers are 67Hz. If no AT command is received to change the parameters, the module will work according to the default parameters.
In data communication mode, the PTT pin must remain high.
The normal operation of the module requires a 3.6-4.2V power supply and at least 1A of current. When the PD pin is at a high level, the module works. When the PD pin is at a low level, the module is turned off.
1. After the module is powered on, if no AT command is received, the default working parameters are: Bandwidth: Wideband
Transmit frequency: 150.050MHz
Receive frequency: 150.050MHz
Transmit subcarrier: 67Hz
Receive subcarrier: 67Hz
Squelch level: 2
Scrambler: Off
Compression: Off
Transmit timeout: Off
MIC sensitivity: 6
Audio output level: 62. In data communication mode, the PTT pin cannot be low level. 3. Working conditions of the module:Recommended DC voltage: 3.6-4.2V, the power supply must provide more than 1A current;
The PD pin of the module must be high level;
PD can be used as the on/off control pin of the module.
AT command type
1) Command without parameter:
AT+<command>,eg.:AT+DMOCONNECT
2) Command with parameter:AT+<command>=<par1>,<par2>,<par3>…
3) Response command format are as below :
<CR><LF><command string>
<CR><LF>
<CR> Enter,0x0D
<LF> Newline,0x0A。
1.2 AT Command format
All the AT command started with “AT”, And ended with<CR>。
The UART port default setting are as below:
8 bit data,
1 bit stop,
without parity ,
CTS/RTS,
9600 baut
ATcommand response format:
<CR><LF><command string><CR><LF>
Simplified instruction for SR105, SR110 and SR120 Serial for the older version SR-FRS-V and SR-FRS-U AT command you can visit this link: https://docplayer.net/91122125-Sr-frs-0w5-wireless-transmit_receive-data-transfer-module-uhf-vhf-uart-communication-protocol.html
AT+DMOGRP(old version command AT+DMOSETGROUP ): Set transmit frequency, receive frequency, sub audio, bandwidth, busy channel lockout, transmit power.
Description: Set frequency, sub audio frequency, power, bandwidth and other parameters.
Format: AT+DMOGRP=RFV,TFV,RXCT,TXCT,Flag,Flag1Example (text input):
AT+DMOGRP=450.02500,450.02500,RR,TT,0,0 (Carriage return/line feed)
Because RR and TT represent sub audio frequencies, they cannot be entered directly in text format; see explanation below. RFV, TFV, frequency values, must be 5 digits after the decimal point.
Example (HEX input):
41 54 2B 44 4D 4F 47 52 50 3D 34 35 30 2E 30 32 35 30 30 2C 34 35 30 2E 30 32 35 30 30 2C 70 06 2C 70 06 2C 30 2C 30 0D 0A Response:
+DMOGRP:0 Success
+DMOGRP:1 Failure
Parameter description:
RFV: Receive frequency value:400.00000-480.00000MHZ (integer multiple of 6.25K or 2K5)
TFV: Transmit frequency value:400.00000-480.00000MHZ (integer multiple of 6.25K or 2K5)
Note: The transmit frequency and receive frequency can be the same frequency or different frequencies (ASCII)
RXCT: DO D1 Receive coding has 2 BYTES. (Hexadecimal number)
Format: BCD code (see explanation below)
The low four bits of RXCT1 are the decimal part. If DEC is not set, fill in FF FF. For example:
67.7 D0D1 data 0x77 0x06
D023N D0D1=23
80 D244N D0D1=44
82 D023I D0D1=23
C0 D251I D0D1=51 C2
TXCT: Transmit encoding (hexadecimal number), the same as receive encoding.
Flag: (ASCII)
Bit0 Busy channel lockout (0: Off 1: On) (default off)
Bit1 Wide/narrow band (0: Wideband 1: Narrowband) (default wideband)
FLAG = bit1 *2+ bit0;
Flag1: (ASCII) (Invalid for SR105U model, please set FALG1 to 0)
Bit0 High/low power (0: High power 1: Low power) (default high power)
Default: Transmit/receive frequency 450.05000, sub audio 67Hz.
FLAG1 = 0;
1. RXCT and TXCT are HEX, not ASCII, so commands cannot be sent directly in text format. For example:Enter the command in text mode on the computer:
AT+DMOGRP=450.02500,450.02500,RR,TT,0,0(press Enter)In the PC serial port tool, switch to send in hexadecimal (HEX) format. The result is:
41 54 2B 44 4D 4F 47 52 50 3D 34 35 30 2E 30 32 35 30 30 2C 34 35 30 2E 30 32 35 30 30 2C 52 52 2C 54 54 2C 30 2C 30 0D 0A
Red represents RR, TT corresponding positions
R R T TIf the sub audio frequency you need is 67.0, after format conversion, the corresponding sub audio is 70 06; Replace RR and TT with 70 06, so the correct command is:
41 54 2B 44 4D 4F 47 52 50 3D 34 35 30 2E 30 32 35 30 30 2C 34 35 30 2E 30 32 35 30 30 2C 70 06 2C 70 06 2C 30 2C 30 0D 0A
Then click Send.Note:
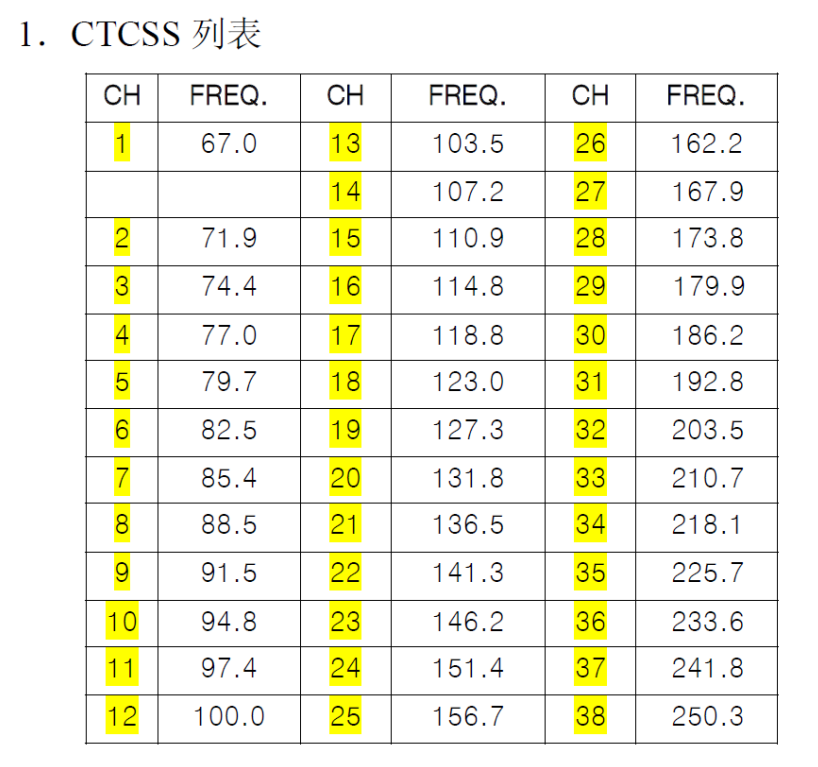
1. Sub audio setting method:
1) For analog sub audio
For example: 67.0 67.0 →06 70→ D0 D1= 70 06
250.3 250.3 →25 03→ D0 D1= 03 25
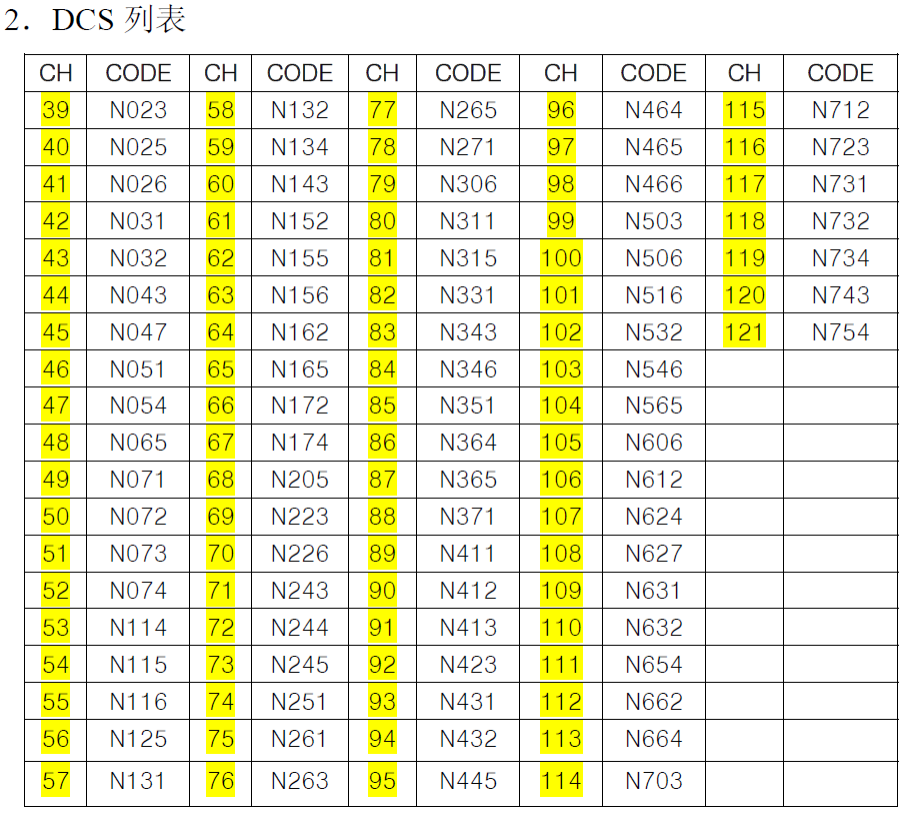
2) For digital sub audio
Positive polarity D1 MSB is 8; for example:
D023N 023→8023→ D0 D1=23 80
D244N 244→8244→ D0 D1=44 82
Negative polarity D1 MSB is C;
D023I 023→C023→ D0 D1=23 C0
D251I 251→C251→ D0 D1=51 C22. FLAG/FLAG1 setting method
BIT1 BIT0 according to the 8421 BCD code to take the value
FLAG = BIT1 * 2 + BIT0
FLAG1 = BIT1 * 2 + BIT0
For example:
1) FLAG: Bit1 = 1; bit0 = 0
FLAG corresponds to BCD code 2 + 0 = 2; FLAG set value is 2;
2) FLAG: Bit1 = 1; bit0 = 1
FLAG corresponds to BCD code 2 + 1 = 3; FLAG set value is 3;
2) FLAG: Bit1 = 0; bit0 = 1
FLAG corresponds to BCD code 0 + 1 = 1; FLAG set value is 1;
AT+DMOSAV(old version command AT+DMOAUTOPOWCONTR ): Automatic power saving function setting
CommandDescription: Set the automatic power saving function of the module.
Format: AT+DMOSAV=X
Example:
AT+DMOSAV=0(Carriage return/line feed)
Response:
+DMOSAV:0 Success
+DMOSAV:1 Failure
Parameter description:
X:
0 Set power saving on
1 Set power saving off
(The default is 0, automatic power saving is turned on)
AT+DMOVOL( old version command AT+DMOSETVOLUME ): Output volume setting
Description: Set the audio output volume level of the module. The larger the value, the greater the volume. Format: AT+DMOVOL=X
Example:
AT+DMOVOL=1 (Carriage return/line feed)
Response:
+DMOVOL:0 Success
+DMOVOL:1 Failure
Parameter description:
X: Volume level parameter value range: 1-9
(The default is 6)
AT+DMOVOX( old version command AT+DMOSETVOX ): Voice control function setting
Description: Set the voice control trigger sensitivity of the module. The larger the value, the more sensitive the trigger.
Format: AT+DMOVOX=X
Example: AT+DMOVOX=0 (Carriage return/line feed)
Response:
+DMOVOX: 0 Success
+DMOVOX: 1 Failure
Parameter description:
X: Voice control level parameter value is 0-8 levels, (default off)
0: Turn off voice control trigger transmission
1-8: Turn on voice control and represents the sensitivity level of voice control trigger. (The default is 8)
AT+DMOFUN( old version command AT+DMOSETMIC ): Parameter settings: squelch level, MIC sensitivity, transmit timeout, compression, scrambling
Description: Set the parameters of the module: squelch level, transmit timeout, MIC sensitivity, scrambling, compressionFormat: AT+DMOFUN=SQL,MICLVL, TOT,SCRAMLVL ,COMP Example:
AT+DMOFUN=2,6,0,0,0(Carriage return/line feed) Response:
+DMOFUN:0 Success
+DMOFUN:1 Failure
Parameter description:
SQ: Squelch level: 0-8 (0: Monitor mode)
MICLVL: MIC sensitivity level parameter value is 0-8 levels (default level 5)
TOT: Transmit timeout, setting range: 0~9; (default off)
0: Turn off transmit timeout
1~9: Represent transmit timeout 1 minute to 9 minutes respectively)
SCRAMLVL: Scrambling function parameter value 0-7. (0 means scrambling is off), (default off)
COMP: Compression function switch
0: Off
1: On (default off)
AT+DMOMES(old version command AT+DMOMES ) SMS sender sending command
Description: Set the SMS sending function of the module, air rate 1200 baud rate
Format: AT+DMOMES=Lxxxxxxx Example:
AT+DMOMES=7ABCDEFG(Carriage return/line feed)
41 54 2B 44 4D 4F 4D 45 53 3D 07 41 42 43 44 45 46 47 0D 0A
Response:
+ DMOMES:0 Success
+ DMOMES:1 Failure
Parameter description:
L: The character length of the SMS (hexadecimal number, maximum length 70BYTE).
XXXXXXX: SMS content
Notes:
1. When sending SMS in text format, the “7” in the text actually represents 0X37 and will be wrong. Before sending, you must switch to HEX format to send, and manually change 0X37 to 0X7.
Text input, directly converted to HEX, the length here is wrong:
41 54 2B 44 4D 4F 4D 45 53 3D 37 41 42 43 44 45 46 47 0D 0A
You need to change 37 to 07, correct as follows:
41 54 2B 44 4D 4F 4D 45 53 3D 07 41 42 43 44 45 46 47 0D 0A2.
Note: The new modules cannot be compatible with the old products of the same type.
AT+DMODTF DTMF: sending and receiving (please contact customization, the standard shipping version does not contain this function)
Send DTMF signal
Description: Send DTMF digits 0-9 or letters ABCD*#
Format: AT+DMODTF=XY Example: AT+DMODTF=09
Response:
+DMODTF:0 Success
+ DMODTF:1 Failure Parameter description:
XY send digits
00 send DTMF code: 0
01 send DTMF code: 1
02 send DTMF code: 2
03 send DTMF code: 3
04 send DTMF code: 4
05 send DTMF code: 5
06 send DTMF code: 6
07 send DTMF code: 7
08 send DTMF code: 8
09 send DTMF code: 9
XY send characters:
10 send DTMF: A
11 send DTMF: B
12 send DTMF: C
13 send DTMF: D
14 send DTMF: *
15 send DTMF: #
Receive DTMF signal
Description: After the module demodulates the received DTMF, it automatically uploads it through the serial port.
Format: +DMODTF:XY Example: +DMODTF:09
Response: None
Parameter description:
XY received digits
00 received DTMF code: 0
10 received DTMF code: 1
11 received DTMF code: 2
12 received DTMF code: 3
13 send DTMF code: 4
14 received DTMF code: 5
15 received DTMF code: 6
16 received DTMF code: 7
17 received DTMF code: 8
18 received DTMF code: 9
XY received characters:
10 received DTMF: A
11 received DTMF: B
12 received DTMF: C
13 received DTMF: D
14 received DTMF: *
15 received DTMF: #
AT+DMOCONT: Handshake instruction, communication connection test
Description: Communication handshake command
Format: AT+DMOCONT Example: AT+DMOCONT (Carriage return/line feed)
Response: +DMOCONT:0
Parameter description: None.
AT+DMOREST: Restore factory settings
Description: Reset all parameters to factory default settings
Format: AT+DMOREST
Example: AT+DMOREST (Carriage return/line feed)
Response: +DMOREST:0
Parameter description: None.
AT+DMOEND: Tail tone setting
AT+DMOEND Echo tail setting (please contact customization if needed, standard shipping version does not contain this function)
Description: Turn on or off echo tail setting
Format: AT+DMOEND=X
Example: AT+DMOEND=0 (Carriage return/line feed)
Response: +DMOEND:0
Parameter description:
X is an on/off switch to open or close the echo tail function
0: Turn on echo tail; (default)
1: Turn off echo tail;
Special instructions: Unless there is a clear requirement, please be sure not to turn off the echo tail. Turning off the echo tail will cause a large noise when the receiving end closes the speaker at the end of transmission.
AT+DMORSSI: RSSI signal strength query
Description: Query received signal strength,
Format: AT+DMORSSI
Example: AT+DMORSSI (Carriage return/line feed)
Response: + DMORSSI:XXX XXX is the signal strength value, just a relative value;
Parameter description:
XXX: 000-127
Data reference: (The larger the returned value, the stronger the signal)
Receiving sensitivity: RSSI
OFF <30
-120 036
-110 046
-100 055
-90 065
-80 075
-70 085
-60 094
-50 103
-40 115
-30 127
-20 127
-10 127
0 127
1. Parameter settings can be retained after power off;
2. After the module is powered on, you must delay 0.5S before setting various parameters of the module;
3. Parameters cannot be set when the module is in the transmit state;
AT+DMOVERQ: Query software version number
Description: Query module version command
Format: AT+DMOVERQ
Example: AT+DMOVERQ (Carriage return/line feed)
Response:+DMOVERQ:105U-VXXX
Parameter description:
XXX is the software version number, such as 100


